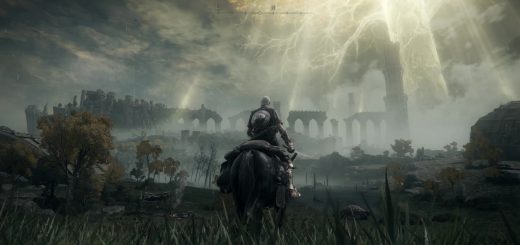


Gabe’s Grace – Reshade Preset
This reshade is my personal touch to Elden Ring’s fantastic world, it’s a sharp and somewhat dramatic, whilst not straying too far from the original look.
EXPLANATIONS
First and Foremost:
We as humans are different from each other,
we all have our preferences and that’s what makes us
stand from each other!
knowing that we have personal tastes should be fundamental
when you are both building and downloading a reshade 😛
So, straight to the point.
If you’re like me and love to
just experiment with people’s creations,
then you’ll do fine with my reshade and any reshade in general,
but if you’re one of the “purists” that starts having a seizure whenever
someone go beyond the “original vision” the creators of the game had in mind…
then i recommend you not installing a reshade at all and stay pure hahaha (don’t take me serious :P)
What Exactly Gabe’s Grace do?
I made this reshade with 2 things in mind,
1: dehazing, which is the fog that the game has (which is beautiful btw)
but i wanted something not so soft and more impactful/darker/vibrant… robust… precise! to look at
2: color tweaks, i decided to go for a more “grounded” look again,
shifting the aquas to more blues and magentas and definitely lots of orange (love it!)
3 actually XD: enhancing the ambient occlusion for those closeups shots
and grass shadowing, i’ve used qUINT’s ambient occlusion plugin which is all free
and decided to just keep it as close to the camera as possible, not rendering too far away,
(because that can cause uggly visuals and makes the poppin’ more noticeable”
and bloom, because elden ring has so much beautiful light sources that already casts a nice
bloomy effect, but i wanted them a bit warmer and “spreaded” if you catch my drift.
AND BY THE WAY!
i’m not here to say that my reshade is better
than the vanilla visuals or that any of these
adjustments i made, where because the “lack of it all”
because, Elden Ring at it’s vanilla state it’s the true way to play
and we make reshades just to have fun and style with it,
so always bare that in mind before judging mine or any creator’s material,
it’s all about prefferences and there’s plenty of it to chose… if you still haven’t found yours,
then make one! 😀 why not? share it with us, this is art! <3,
GABE’S GRACE ORIGINAL:
This is the main one, with all the “glamour” here you’ll have:
Amd Fidelity FX > MXAO > Lightroom adjustments > Clarity > Bloom > ColorLab > HDR (FakeHDR)> GaussianBlurCS (though it’s tweaked negatively to behave as “clarity”)
GABE’S GRACE BASIC:
This is just the basic colors with no depth shaders and it looks great aswell, for those looking
for a sharper cleaner image.
Lightroom adjustments > Clarity > ColorLab > Hdr (FakeHDR) > GaussianBlurCS
PERFORMANCE:
Not gonna lie, this is gonna cost yall 5/7 fps depending on your machine,
i have a RX 5500 XT with 4GBs of VRAM and i’m running on Maximum Settings
with an average of 35/40 FPS, but honestly… it’s not like the game is not stuttering btw >.<
so i decided to lock at 30 fps and have a 50% stable experience (thanks from software, again…)
but it really boils down to the resolution you're playing, the higher the res, the higher the punch, remember that.
INSTALLATION:
1: DOWNLOAD AND INSTALL RESHADE
Step 1: Execute Reshade Stup (ReShade_Setup_5.0.2.exe) (or whatever version it is when now)
Step 2: Select “Elden Ring” from the list
if it’s not on the list, then hit “Browse…” and go to your game’s directory, for example (steam/steamapps/commom/ELDEN RING/Game/eldenring.exe
Step 3: hit Next and keep the box marked at “Directx 10/11/12” (which is this game’s api) hit next again
Step 4: check all the boxes by clicking “uncheck all” 2x, hit next and finish, you’re done!
2: INSTALLING THE PRESETS
Step 1: (optional but organized)
Create a folder inside your game’s root and call it whatever you want to store the presets (so they don’t end up lost in the middle of those files… cruel)
example (Reshade Presets)
Step 2: Open Gabe’s Grace.zip with your program of choice and move the preset of choice to your “Reshade Presets” folder.
Step 3: Now run the game and press “Home” on your keyboard and skip the tutorial if you haven’t done so, or stick around…
click on the bar bellow the tabs and select the “Reshade Presets” folder > Now select one of the presets “GABE’S GRACE – ORIGINAL or GABE’S GRACE – BASIC” and it’s done!
feel free to tweak it to your likings, you can make shortkeys for each and every single pluggin, just hover above them
and right click, then put whatever keybind comes to mind, this is useful when you’re in the middle of a cutscene and
let’s say, Ambient Occlusion starts to show above the game’s Depth of Field and it can look uggly, nothing we can do for now,
it’s the limitations of reshade, maybe in a future who knows…
Once again, i hope you enjoy it, if you find the clarity and gausian blur too strong, tweak them or remove them completely,
it’s your game, i just shared MY vision! have fun 😀


